tomatillo relish


Tomatillos

I have a tomatillo salsa recipe that I use often that calls for canned tomatillos.  It is super fast and easy to make, and putting it out instead of a traditional red salsa is refreshing.  I knew that if I boiled them or oven roasted them, I would get the salsa that the canned tomatillos produce.  But because of that recipe, I wanted to try to grow the little suckers this year myself, and work with fresh tomatillos.  I tell you that these grew into sprawling plants, and not ‘compact bushes’ as the seed packet claimed. My plants yielded over 80 little cuties… a lot of tomatillos for a small garden.  It was tomatillo takeover!  I chose to grow two plants and I am glad I did.  Who knew that apparently they needed each other to cross-pollinate. (rookie).  Also, whether you grow them yourself or purchase fresh tomatillos, store them on your counter and don’t put them in the fridge.  You will ruin them.
It was fun using fresh tomatillos this time.  Since they aren’t broken down by heat it is more of a relish in my opinion.  It goes well with everything!  I topped my fish tacos in place of a slaw, mixed it in my chicken salad for extra flavor, and added them to my turkey burgers.   I love having a condiment like that in my fridge to just throw on your meal.  You can opt to jazz it up with lime and loosen it with more water to make it more of a salsa.  Enjoy!

relish ingredients

fresh tomatillo relish

20  raw tomatillos, husks removed, rinsed to remove sticky film
1-2  jalapeno pepper depending on heat preference, chopped
1/4  cup red onion, chopped
1  garlic clove, chopped
1/3 cup cilantro, chopped
1/2  tsp. sugar
few pinches of kosher salt

get started on relish:

add all ingredients into a food processor and pulse until desired consistency.  Store relish in an airtight container in your fridge.

fresh tomatillo relish

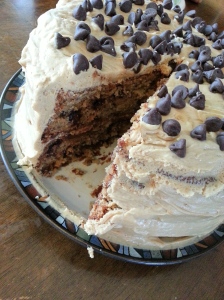
banana chocolate chip cake with peanut butter frosting


banana chocolate chip cake with peanut butter frosting

I don’t bake.  Actually I should say that I don’t bake well. Salt gets forgotten, butter gets neglected to get to room temperature, or my personal favorite was my choice to use a removable bottom cake pan when making my grandmother’s gooey biscuit cake (think monkey bread), and I open the oven to find all the yummy brown sugary syrup had oozed on out of that pan and formed a hard slick on the bottom of my oven.  So it is ironic that my first post is of a cake. However, as I stated in my ‘about page, I like to challenge myself.  Chalk it up to being stubborn.  So memories of dry cookies and purple-green blueberry muffins banished, I decided I was going to try this recipe.  I tore it out of the Bon Appetit October 2012 issue because…oh hell, just look at it.  It’s like a perfect storm of all good ingredients.  So armed with a Stuart Smalley-like mantra of ‘I can do this’, I dove into making this cake.  A short word on a few changes I made – one deliberate and one not.  One – I used regular sized chocolate chips as that is what I had in my cabinet, and two – I used two round cake pans because I didn’t read the recipe all the way through.  Classic Erin.

banana & chocolate chip cake with peanut butter frosting (adapted from Bon Appetit October 2012)

cake:

2  9 inch round non-stick cake pans
non-stick spray (either canola or baking)

3  cups all-purpose flour
2  tsp. baking soda
2  tsp. kosher salt
1 1/2  cups sugar
1  cup unsalted butter, room temperature (go figure)
1/2  cup packed brown sugar
3  large eggs
1 1/2  tsp. vanilla extract
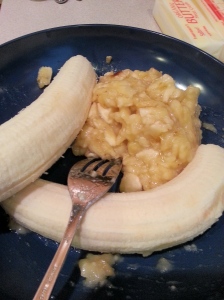
2  cups mashed very ripe bananas (about 4 large)
1  cup sour cream
1  10 oz. bag of semi-sweet chocolate chips, save some for the top of cake

mashed bananabanana batter

frosting:

2  cups creamy peanut butter
1 1/2  cups powdered sugar
1  cup unsalted butter, room temperature (again)
2 1/2  tsp. vanilla extract
chocolate chips

banana cake slicebanana cake

get started on the cake:

Preheat oven to 350.  Coat cake pans with non-stick spray.  Line bottom of pans with parchment and coat with non-stick spray (although I skipped the paper step).  Whisk flour, baking soda and salt in a medium bowl.  Using an electric mixer, beat the sugar, butter and brown sugar in a large bowl until light and fluffy, about 3 minutes.  Add eggs one at a time, beating to blend between additions.  Occasionally scrape down sides and bottom of bowl to fully blend.  Beat in vanilla.
Add dry ingredients; beat on low speed, just to blend.  Add bananas and sour cream; beat just to blend.  Fold in chocolate chips.  Divide batter evenly among pans; smooth tops.   (I chose to drop each pan flat on counter because I saw it on a cooking show and always wanted to do that!)
Bake cakes until a toothpick inserted into the center comes out clean, about 35 minutes.  (I had to add 10 more minutes because of my larger pans).  Transfer to a wire rack; let cool in pans for 10 minutes.  Invert cakes onto racks to completely cool.  Peel off parchment if you chose to use.

get started on frosting:

Using an electric mixer, beat first four ingredients in a medium bowl until a light and fluffy frosting forms, 2-3 minutes.

assembly:

Place one cake on a plate.  Spread 1 1/4 cups frosting evenly over the top of the cake.  Place remaining cake on top with flat side (bottom) facing up.  Cover top and sides of cake with remaining frosting.  Garnish with chocolate chips however you see fit!  You can spell something, do a design, or just leave it random.

note:

Cake can be made 2 days ahead.  Cover and chill.  Let stand at room temperature 1 hour before serving.  (My kids complained that the frosting was hard when serving a slice right from the fridge..boo hoo).